Showing posts with label upholstery. Show all posts

Friday, October 11, 2013

Coral Madness Project # 1

I've been working on several projects for the guest bedroom. One of those projects is recovering a $5 chair I got at the thrift store. Here's a sort of before (I got excited and started painting!):


Obviously, I spray painted the arms and legs grey. Then I dry brushed white paint over all the wood:


I love this look! Then it was time to reupholster the chair. I decided it needed some extra cushioning on the seat:

Then I got out my staple gun and fabric and went to town. Here's the finished result:


The back piece is tacked on with upholstery nails.


Here's what the arms look like up close:


I love the result. You can see in the background of some of this pictures that I am working on the guest room. I have curtains up and book shelves in. I will be sharing more pieces of the room soon. I've barely put a dent in the fabric I ordered for this project. I am considering making a floor poof out of the leftovers.

I can't wait to share the rest of my guest room makeover!

Don't settle for dull, live a refinished life!

*Planning to share at:
Metamorphasis Monday; Give Me the Goods Monday; Time To Sparkle Tuesday Linky Party; Trash to Treasure; The Power of Paint Party; Wildly Original Linky Party; Transformation Thursday; What have you redone?; Shabbilicious Friday; Start at Home Paint Party; Funky Junk Interiors' Party Junk; Clever Chicks Blog Hop; Serenity Now Weekend Blog Hop

Wednesday, April 17, 2013

Chair: In Progress

I started this chair awhile ago. Here's where I am currently at:


sanded, painted, distressed, and a clear coat over the top. I have to fix one side that's cracked. (Nothing a little wood glue and a clamp can't fix.)
I was going to recover the seat with a tan and off white ticking:


But then I found some burlap coffee sacks at the local fleet and farm.

Here's one side of the sack:


Here's the other:


I am trying to decide which option I like better. Right now I'm leaning towards the sack with just the blue stripe down the center. What do you think?

I'll be sharing this when I get it finished. Hopefully by next week!

Don't settle for dull, live a refinished life!

Monday, August 20, 2012

Leather and Burlap Toy Box Ottomen

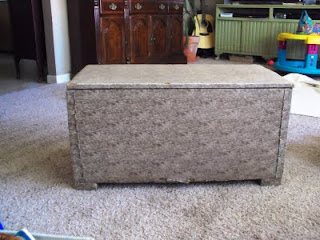
I had redone an auction toy box find previously here, but it wasn't doing it for me anymore. Here's a quick recap of the original box:


Ugly contact paper. Ripped off to reveal this:


*Shudder* Recovered with batting and slipcovers to make this:


Not bad, but even though it was a slipcover, it was a pain to get off, it stained instantly and I didn't wash it frequently enough. Then, I scored this vintage leather coat at a thrift store:


It's a nice burgundy color trench and soft as butter. I would've worn it as is, but sadly the size small didn't fit well. I decided to cover the top of my box with the leather (easy to wipe off clean) and the bottom with some burlap potato sacks I've been saving. I didn't really take any in progress pics, but it mostly involved the staple gun (and occasionally when the staples didn't go in all the way, the hammer). Here's the result:


I forgot to mention, I measured the outside of the box and then sewed sacks together for the right width before stapling on.


The result of which, means that wherever the cut mark for the side of the bag was where the seam went. I kind of like the hodge podge look though. It gives it a very depression era, make do with what you have look, don't you think?

Don't settle for dull, live a refinished life!

*Shared at:

Visit thecsiproject.com

Friday, August 17, 2012

Burlap Coffee Sack Chair

I got a chair at an auction recently for $2.50. That's right, $2.50! It was in okay condition, the legs in the back were split (nothing some wood glue couldn't fix) and it was covered in an ancient ugly vinyl. On the plus side, someone had already stripped the wood arms and legs (No sanding? Bonus!). Here's what it looked like before:


And here's what it looked like after I was all done:


*Sigh* I am in love. And what's not to love? Distressed gray arms and legs:


Burlap coffee sacks for fabric:


I managed to get the back looking good for once:


And I managed to use some of the original rusty upholstery tacks I pulled out:


Yep, it's most definitely love! Have you done any upholstery projects lately?

Don't settle for dull, live a refinished life!

*Shared at:

Furniture Feature Fridays

Visit thecsiproject.com